MLatom GUI tutorial
MLatom has its own GUI (graphical user interface), MLatom-GUI, for user-friendly creation of MLatom input and performing calculations. This tool makes it easier for user to choose appropriate input, so that they do not need to remember all the possible options or look them up every time in the manual.
MLatom-GUI script mlatom-gui.py is written by Bao-Xin Xue and can run on Linux.
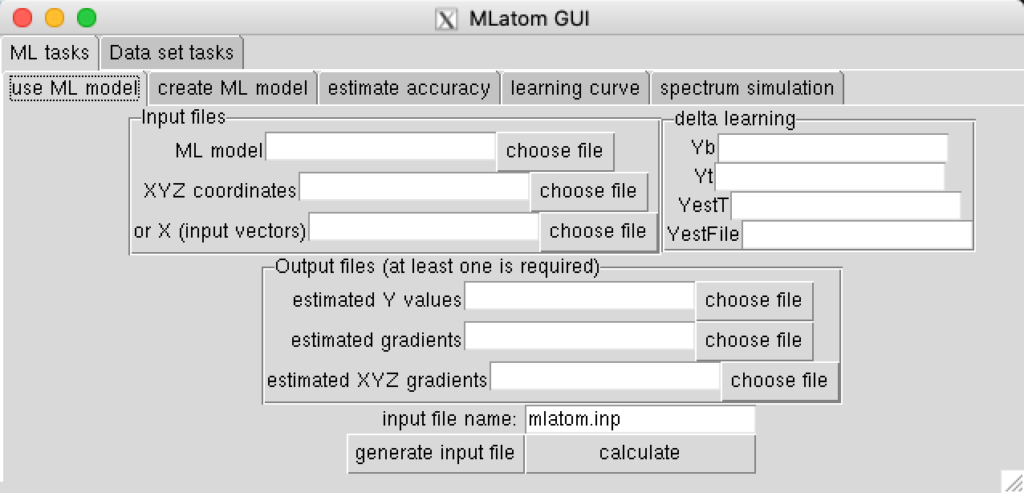
Table of Contents
GUI Layout
This GUI including four part: first level tabs (task type selection), second level tabs (subtask selection), parameter area to specify input options, output/calculation area.

If your mouse hovers at some area, this GUI will also prompt you some hint and information:
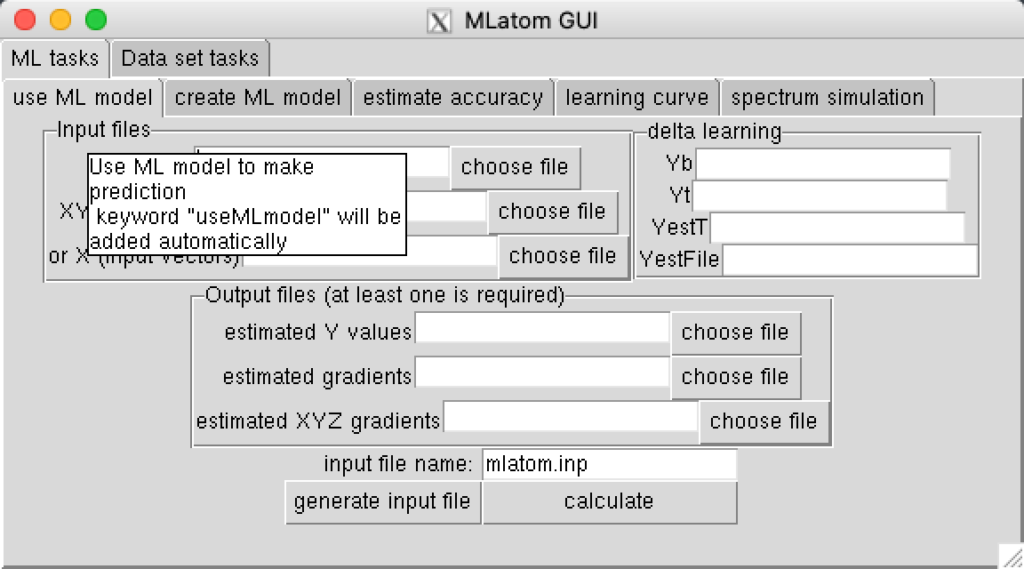
MLatom-GUI will also help you choose file without making a typo, and change the path string into relative path.
Download & Usage
Download & Installation
The GUI is released as a part of MLatom starting from version 2.0.4.
It can be also downloaded here for use with older versions:
Download this zip file, and decompress it, you’ll get a file named mlatom-gui.py, you can put this file at ~/bin/ or any path in your $PATH variable. Then use command chmod +x mlatom-gui.py to add execution permission.
This GUI program is written completely with python standard library, so you don’t need to install any additional python package.
Usage
if you are connecting to linux server through ssh, then you need to download X11 client before using this GUI. For windows user, you can download Xming, for MacOS user, you can download XQuartz. For Linux user, you don’t need to modified anything.
Then you need to enable X11 forwarding function, for macOS & Linux user, you’ll need to use command ssh -Y user@ip -p port command to connect server; for windows user, please enable X11 forwarding function in your ssh software.
Just execute command mlatom-gui.py, then the MLatom GUI window will appear on your local machine.
In order to not occupy current terminal, we suggest to use mlatom-gui.py & command to keep this GUI running at the background, then you will be able to operate current terminal.
AQC Charpter using MLatom GUI
Example 1: Overfitting of the H2 Dissociation Curve
Please create a new directory, then download R_20.dat file with 20 points corresponding to internuclear distances in the H2 molecule in Å and E_FCI_20.dat file with full CI energies (calculated with the aug-cc-pV6Z basis set, in Hartree) for above 20 points:
wget http://mlatom.com/wp-content/uploads/AQCtutorial/H2/R_20.dat
wget http://mlatom.com/wp-content/uploads/AQCtutorial/H2/E_FCI_20.dat
We will use these data to train a ML model (option createMLmodel) and save it to a file (option MLmodelOut=E_FCI_20_overfit.unf) using above data (training set) and the following command requesting fitting with the kernel ridge regression, and Gaussian kernel function and the hyperparameters σ=10−11 and λ=0:
Please open MLatom GUI with command mlatom-gui.py
Train (option createMLmodel) ML model and save it to a file (option MLmodelOut=mlmod_E_FCI_20_overfit.unf) using above data (training set) and the following command requesting fitting with the kernel ridge regression, and Gaussian kernel function and the hyperparameters σ=10−11 and λ=0
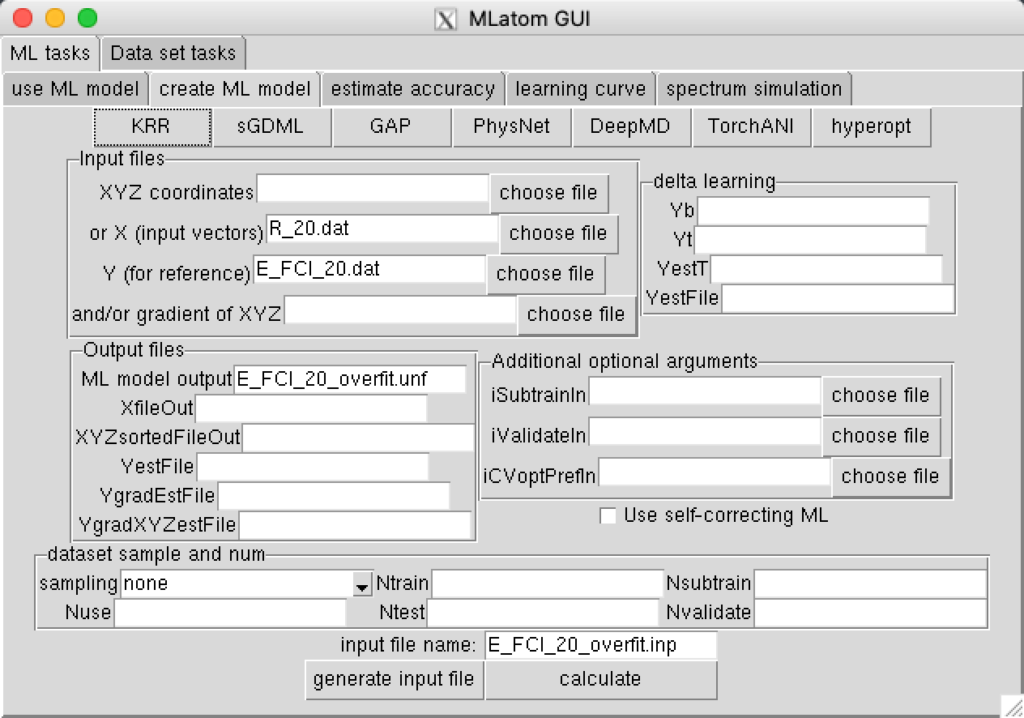
input necessary parameter, then click KRR button:

Then click calculate, check the result.
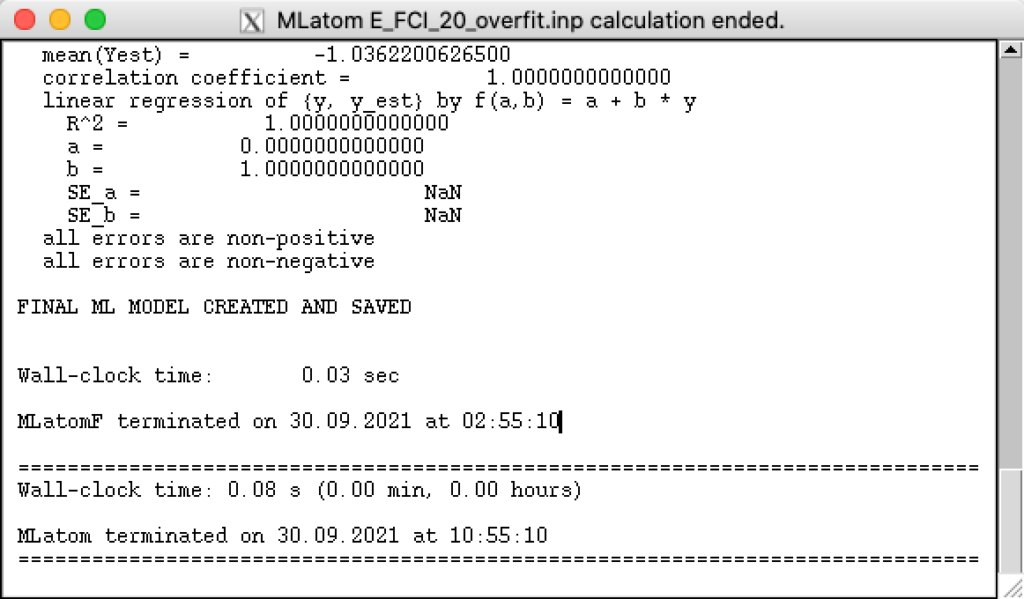
check the ML model, input file, standard output file, error output file:

In the output file E_FCI_20_overfit.inp.out you can see that the error for the created ML model is essentially zero for the training set. Option sampling=none ensures that the order of training points remains the same as in the original data set (it does not matter for creating this ML model, but will be useful later). You can use the created ML model (option useMLmodel) for calculating energies for its own training set and save them to E_ML_20_overfit.dat file:
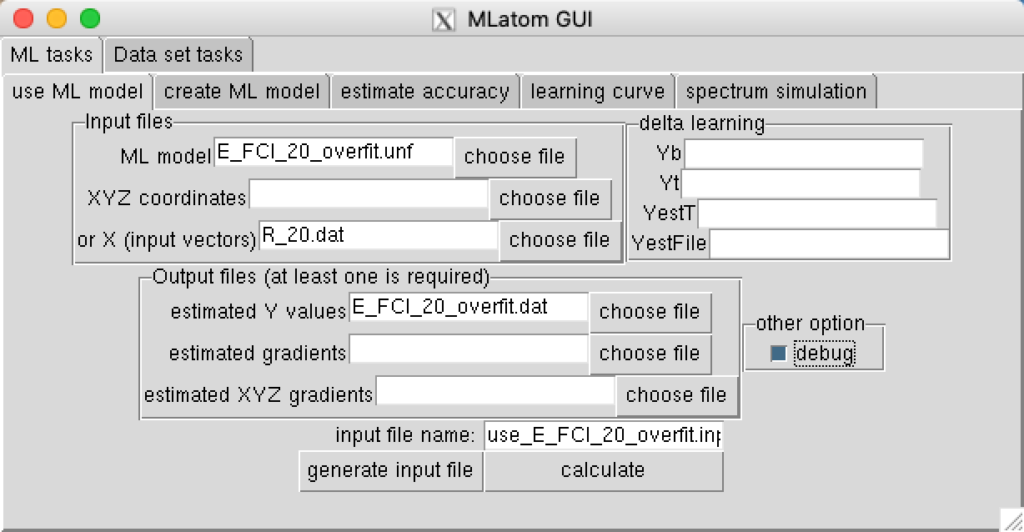
Now you can compare the reference FCI values with the ML predicted values and see that they are the same. Option debugalso prints the values of the regression coefficients alpha to the output file use_E_FCI_20_overfit.inp.out. You can compare them with the reference FCI energies and see that they are exactly the same (they are given in the same order as the training points).
Now try to calculate energy with the ML model for any other internuclear distance not present in the training set and see that predictions are zero. It means that the ML model is overfitted and cannot generalize well to new situations, because the hyperparameter choice.
Example 2: Underfitting of the H2Dissociation Curve
Train (option createMLmodel) ML model and save it to a file (option MLmodelOut=E_FCI_20_underfit.unf) using the data (training set) from Example 1 and the following command requesting fitting with the kernel ridge regression, and Gaussian kernel function and the hyperparameters σ=109 and λ=1:
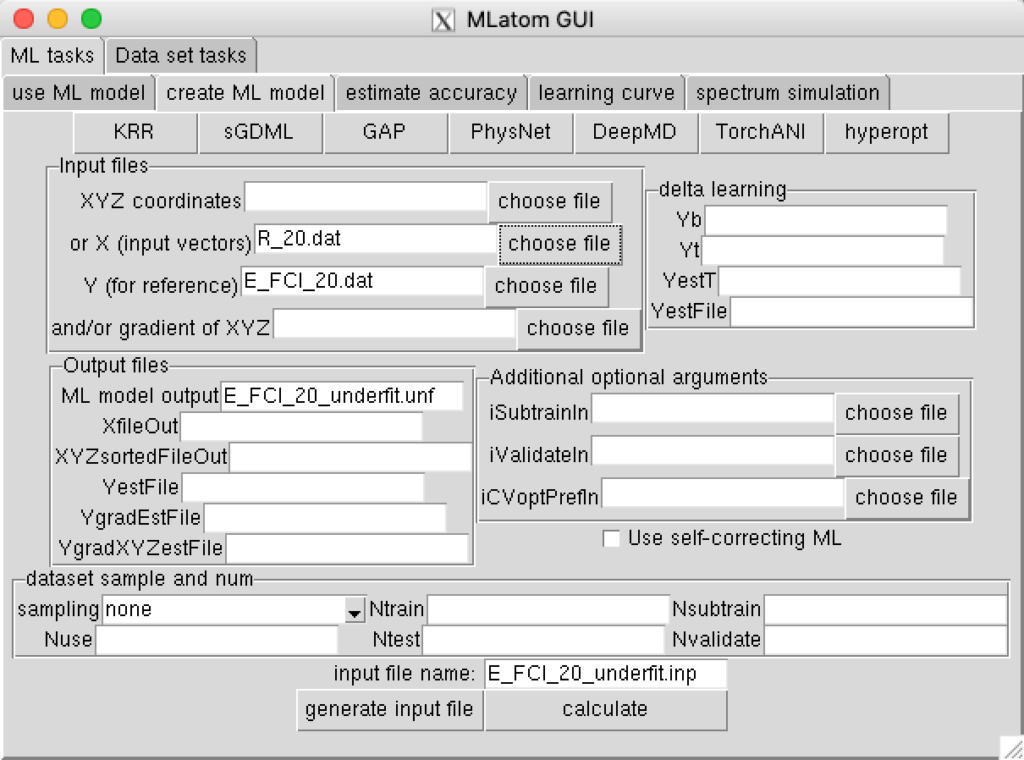
click KRR

close KRR window, click calculate. In the output file E_FCI_20_underfit.inp.out you can see that the error for the created ML model is very large for the training set. You can use the created ML model (option useMLmodel) for calculating energies for its own training set and save them to E_ML_20_underfit.dat file:

You can see that the ML predicted values are the same for all points. Option debug also prints the values of the regression coefficients alpha to the output file use_E_FCI_20_underfit.inp.out. You can sum them up and see that their sum is equal to the ML energies.
Now try to calculate energy with the ML model for any other internuclear distance not present in the training set and see that predictions are do not change. It means that the ML model is underfitted and cannot generalize well to new situations, because the hyperparameter choice.
Example 3: Model Selection and Evaluation for the H2 Dissociation Curve
Please create a new directory then enter it to continue with the following tutorial:
Download the full data set of with 451 points along the H2dissociation curve. File with internuclear distances in the H2molecule in Å and file with the full CI energies (calculated with the aug-cc-pV6Z basis set, in Hartree):
wget http://mlatom.com/wp-content/uploads/AQCtutorial/H2/R_451.dat
wget http://mlatom.com/wp-content/uploads/AQCtutorial/H2/E_FCI_451.dat
Now you can download the indices of the points in the data set to be used as the training, test, sub-training, and validation sets. You can check that all the training points are the same as used in Examples 1 and 2.
wget http://mlatom.com/wp-content/uploads/AQCtutorial/H2/itrain.dat
wget http://mlatom.com/wp-content/uploads/AQCtutorial/H2/itest.dat
wget http://mlatom.com/wp-content/uploads/AQCtutorial/H2/isubtrain.dat
wget http://mlatom.com/wp-content/uploads/AQCtutorial/H2/ivalidate.dat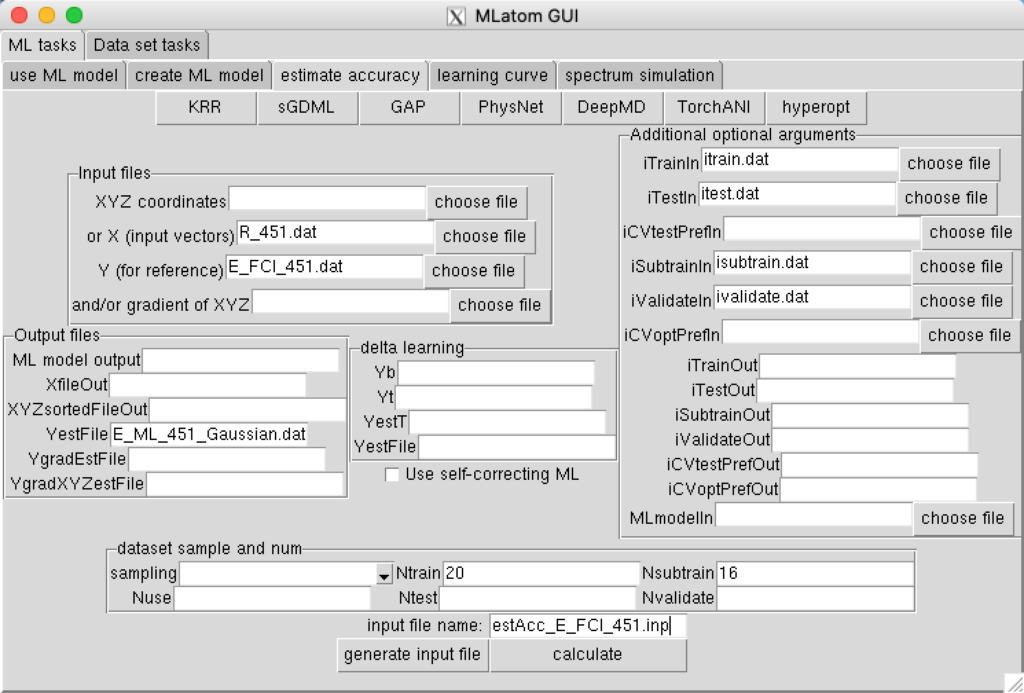
Now we can optimize hyperparameters and evaluate the generalization error of the ML models using a single command. For example, for the Gaussian kernel function:
click KRR:

close KRR window, click calculate, see output window to check the result.
You can compare the ML predicted values saved to the file E_ML_451_Gaussian.dat with the reference values and see that this model generalizes much better than models trained in Examples 1 and 2.
Note that many of these options ( lgSigmaL=-10 lgSigmaH=10lgLambdaL=-40 sampling=user-defined Ntrain=20 Nsubtrain=16 iTrainIn=itrain.dat iTestIn=itest.dat iSubtrainIn=isubtrain.dat iValidateIn=ivalidate.dat ) are given to ensure that you obtain the same result every time you run the command.
You can simply run:
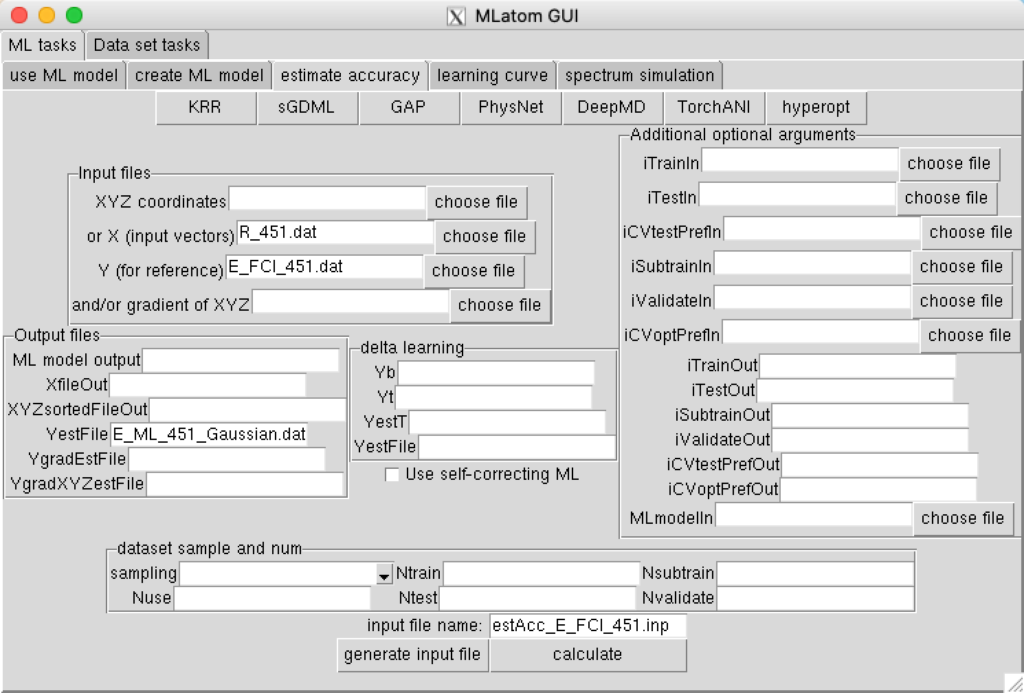

This command will use the random 20% for testing and 20% of training points for validating, i.e. each time you run the command you will see different result. In addition, since MLatom uses the logarithmic search for hyperparameter optimization, you will need to modify the lowest boundaries using commands lgSigmaL=-10 and lgLambdaL=-40 to get better results:

Example 4: Extrapolation vs Interpolation of the H2 Dissociation Curve
Use the files from Example 3, but move the first three indices from the itrain.dat to itest.dat file and remove the first three indices from the isubtrain.dat file. Use the same command as in Example 3 to test the accuracy, but change the number of training and subtraining points accordingly.
Example 5: Delta-learning of the H2Dissociation Curve
Download the file with the UHF/STO-3G energies (in Hartree):
wget http://mlatom.com/wp-content/uploads/AQCtutorial/H2/E_UHF_451.datFollow the procedure described in Example 4, but now instead of learning the FCI/aug-cc-pV6Z energies directly, use the Δ-ML. For this, you need to use the option deltaLearn and instead of Yfile you need to specify files with the baseline (low-level) reference values (UHF/STO-3G, option Yb=E_UHF_451.dat) and with the target (high-level) reference values (FCI/aug-cc-pV6Z, option Yt=E_FCI_451.dat). In addition, you can specify the filenames for file with the Δ-ML energies estimating target level of theory (option E_D-ML_451.dat) and file with predicted ML corrections (option YestFile=corr_ML_451.dat).
Your input parameter for MLatom should look like:
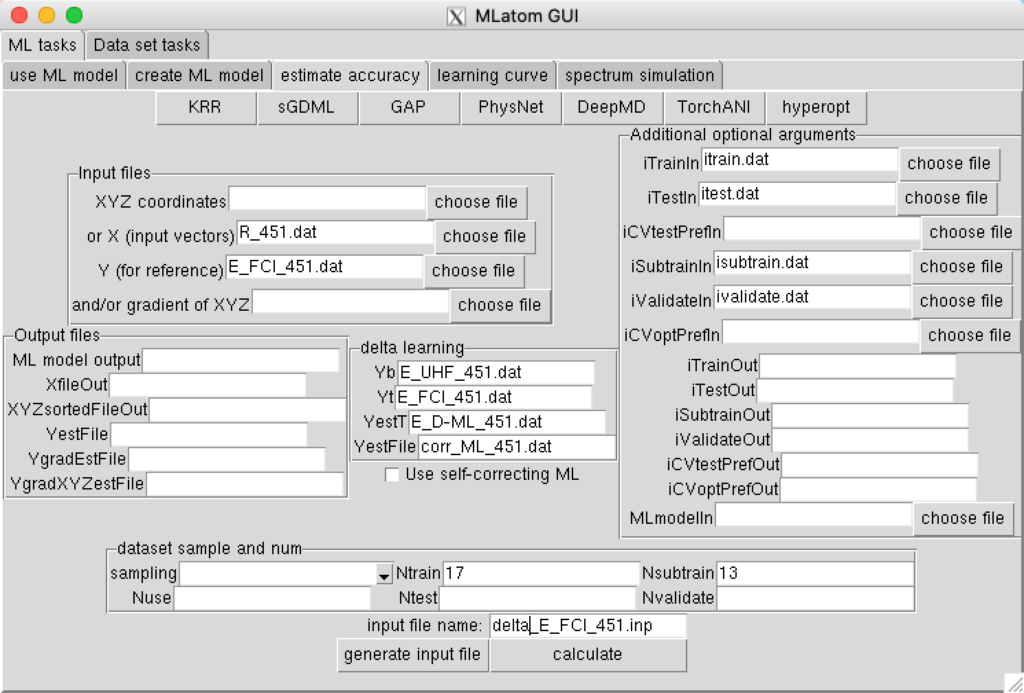

Then close KRR window, and click calculate, You can see that the delta-ML predictions in the file E_D-ML_451.dat are much better than in Example 4.
Example 6: Training on Randomly Sampled Points on the H2 Dissociation Curve
Use the files R_451.dat and E_FCI_451.dat from Example 3. Use the following option:
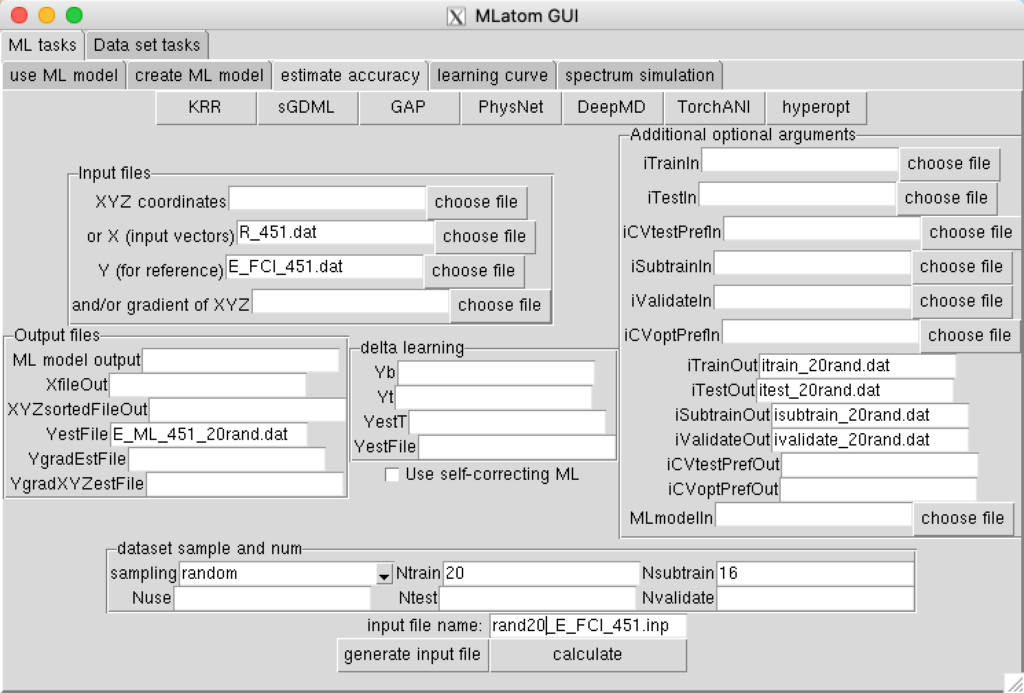

You can find in the output file rand20_E_FCI_451.inp.out various error measures for the random hold-out test set, that should look something like this:
Statistical analysis for 431 entries in the test set
   MAE =           0.0008701190755
   MSE =          -0.0008594726288
   RMSE =           0.0045194135782
   mean(Y) =          -1.0363539894174
   mean(Yest) =          -1.0372134620462
   largest positive outlier
     error =           0.0001099473549
     index = 45
     estimated value =          -1.1566967526451
     reference value =          -1.1568067000000
   largest negative outlier
     error =          -0.0421702385754
     index = 1
     estimated value =          -1.1463026385754
     reference value =          -1.1041324000000
   correlation coefficient =           0.9974017799004
   linear regression of {y, y_est} by f(a,b) = a + b * y
     R^2 =           0.9948103105483
     a =           0.0277384800540
     b =           1.0275947726113
     SE_a =           0.0037190821572
     SE_b =           0.0035833876014
By running this command several times you will see that above numbers are different each time, because each time different training points are chosen as you can check in the itrain_20rand.dat file. Note: the keywords requesting saving indices are optional. MLatom does not overwrite these files and stops if it detects them. Thus, if you run this command again, you should either comment these lines or remove previous files or give them each time different name.
Example 7: Potential energy surface of CH3Cl
Here we follow some of the steps for creating machine learning potential energy surface (PES) of CH3Cl as published in [J. Chem. Phys. 2017, 146, 244108]. We use the data set with 44819 points from [J. Chem. Phys. 2015, 142, 244306], which was kindly provided by Dr. Alec Owens.
Here we show how to:
- Convert geometries from XYZ format to the ML input vectors.
- Sample points to the training, test, sub-training, and validation sets only from ML input using structure-based sampling from the data sliced into three regions.
- Train the s10%-ML model using self-correction and structure-based sampled training set.
Please create a new directory to continue.
Converting geometries to ML input vector
Download xyz.dat file with Cartesian coordinates of CH3Cl, Download eq.xyz file with the near-equilibrium geometry of CH3Cl in Cartesian coordinates:
wget http://mlatom.com/wp-content/uploads/tutorial/CH3Cl/xyz.dat
wget http://mlatom.com/wp-content/uploads/tutorial/CH3Cl/eq.xyz
Convert (option XYZ2X) geometries of CH3Cl in Cartesian coordinates (option XYZfile=xyz.dat) to the ML input vector of normalized inverted internuclear distances (option molDescriptor=RE) with hydrogen atoms (3, 4, 5 in the XYZ files, option permInvNuclei=3-4-5) sorted (option molDescrType=sorted) by their nuclear repulsions to all other atoms:

You should get the file x_sorted.dat (option XfileOut=x.dat) with 44819 lines, each with 10 entries. In the XYZ2X.inp.out file you should see the line Number of permutations: 6.
Sampling points
Here we show how to sample points to the training, test, sub-training, and validation sets only from ML input using structure-based sampling from the data sliced into three regions.
Get the input vector for the equilibrium geometry using the same procedure as in preceding section:

You should get a vector with ten 1.0’s in eq.x.
Sort geometries by the Euclidean distance of their corresponding ML input vector to the input vector of the equilibrium geometry and slice the ordered data set into 3 regions of the same size:

This command should have created files xordered.dat (input vectors sorted by distance), indices_ordered.dat (indices of ordered data set wrt the original data set), and distances_ordered.dat (list of Euclidean distances of ordered data points to the equilibrium). It has also created directories slice1, slice2, and slice3. Each of them contains three files: x.dat, slice_indices.dat, and slice_distances.dat that are slices of the corresponding files of the entire data set.
Use structure-based sampling to sample the desired number of data from each slice:

This command should create itrain.dat files with training set indices in each slice[1-3] directory. Note: it is possible to modify sliceData.py script to submit the jobs in parallel to the queue.
Merge sampled indices from all slices into indices files for the training, test, sub-training, and validation sets using the same order of data points as in original data set:

This command will create four files with indices: itrain.dat (with 4480 points for training), isubtrain.dat (with 80% of training points also chosen using structure-based sampling), itest.dat, and ivalidate.dat.
Creating ML model
Download y.dat file with the reference energies:
wget http://mlatom.com/wp-content/uploads/tutorial/CH3Cl/y.datIn [J. Chem. Phys. 2017, 146, 244108] we optimized hyperparameters using the validation set with points having deformation energy not higher than 10000 cm-1. You need to filter out the points with higher energies from the validation set. To do this move the file ivalidate.dat to ivalidateall.dat and use the following Python 2 script:
mv ivalidate.dat ivalidateall.dat
wget http://mlatom.com/wp-content/uploads/tutorial/CH3Cl/ivalidate.txt
mv invalidate.txt invalidate.py
python2 invalidate.py
Now you can train ML model using the reference data for 4480 training points defined in itrain.dat file using the same procedure as described in [J. Chem. Phys. 2017, 146, 244108]. Check how many points are in files with indices and use the following input:


The calculation created mlmodlayer[1-4].unf files with ML models for each of the 4 layers of the self-correcting procedure. Since we used 4480 out of 44819 points this model is equivalent to s10%-ML model in [J. Chem. Phys. 2017, 146, 244108]. The above command created files ylayer[1-4].dat with ML predictions for each of the layers. The final predictions are in the ylayer4.dat. You can compare this values with the reference values for the entire data set using the following Python 2 script:
wget http://mlatom.com/wp-content/uploads/tutorial/CH3Cl/compare_weighted.txt
mv compare_weighted.txt compare_weighted.py
python2 compare_weighted.py
The error should be 3.44 cm-1.
Example 8: Importance of Sampling in Critical Regions
Create a new directory then enter it.
Download files R.dat with coordinates and NAC.dat with reference nonadiabatic couplings calculated with the spin-boson Hamiltonian model in 1-D (J. Phys. Chem. Lett. 2018, 9, 5660):
wget http://mlatom.com/wp-content/uploads/AQCtutorial/NACs/R.dat
wget http://mlatom.com/wp-content/uploads/AQCtutorial/NACs/NAC.dat
Train ML model on 10 randomly sampled points and make predictions with this model for all points in the data set using the following input file:
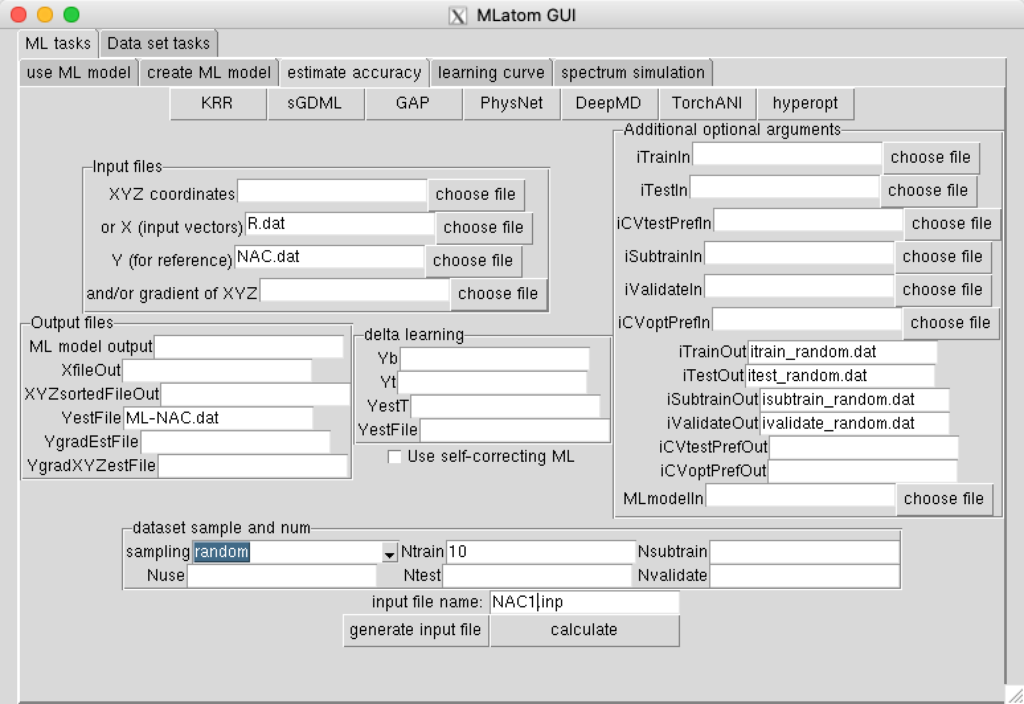

You can compare reference nonadiabatic couplings with the ML couplings saved to file ML-NAC.dat. If you are very lucky, ML can describe the narrow peack. In most cases though, such an ML model will miss the peak. You can however describe this peak properly, if you know the position of the peak beforehand and add it to the training set. Add the index of the minimum in the data set to the files with indices of training and sub-training points, then use the following input file to train ML model on 11 points (10 previously sampled random points + 1 critical point) and to use this ML model to predict nonadiabatic couplings for all points in the data set:
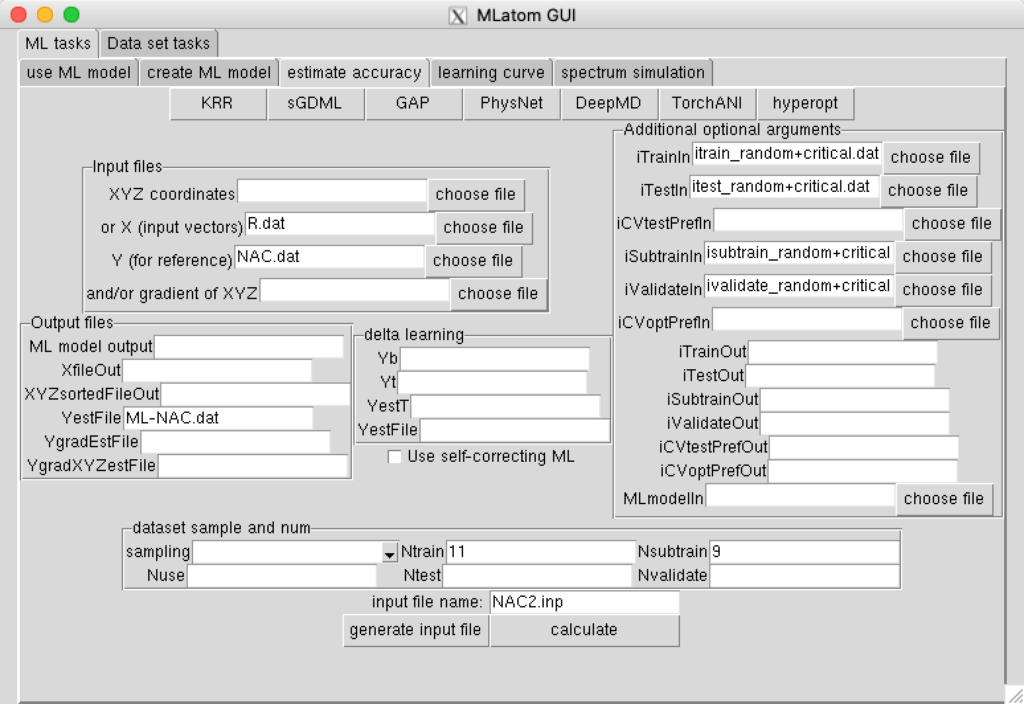

As you can see, the ML predictions improved significantly.
Tutorial for Absorption Spectrum Simulation
Example 1
we’ll start with a simple example: Simulating absorption spectrum with pre-calculated data
Firstly, you need to download these data, and then decompress it with unzip command.
You’ll find sev.eral file:
E1..10.dat             # data
f1..10.dat             # data
cross-section_ref.dat  # reference spectrum data
eq.xyz                 # equilibrium geometry
nea_geoms.xyz          # ensemble of 1001 conformations
inp                    # input file
The “inp” file, we will not use this file this time, because we’ll generate it by this GUI program.
open MLatom GUI, then select “spectrum simulation”, then fill the parameter,
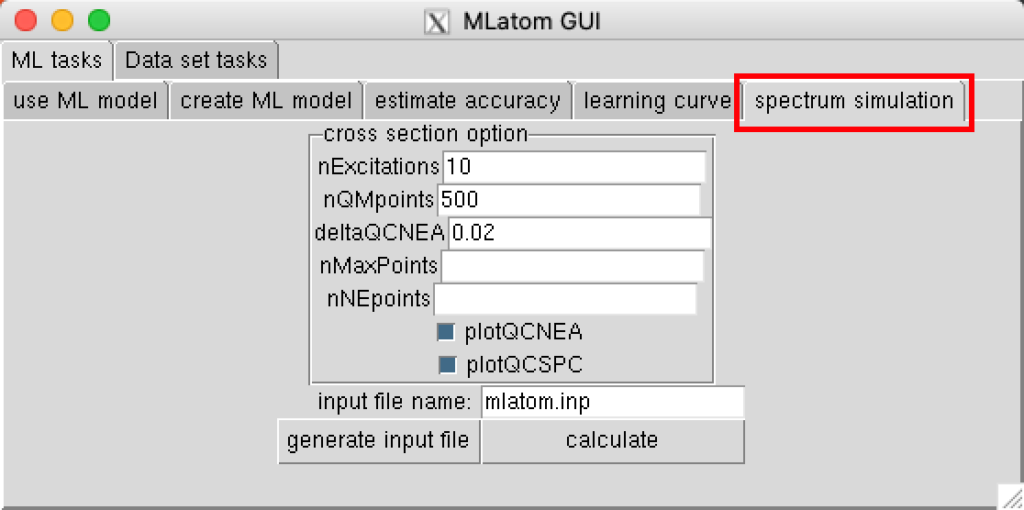
click calculate, MLatom will starting running,

after MLatom finished, you’ll get a prompt:

Then check the log to see whether it ended normally:
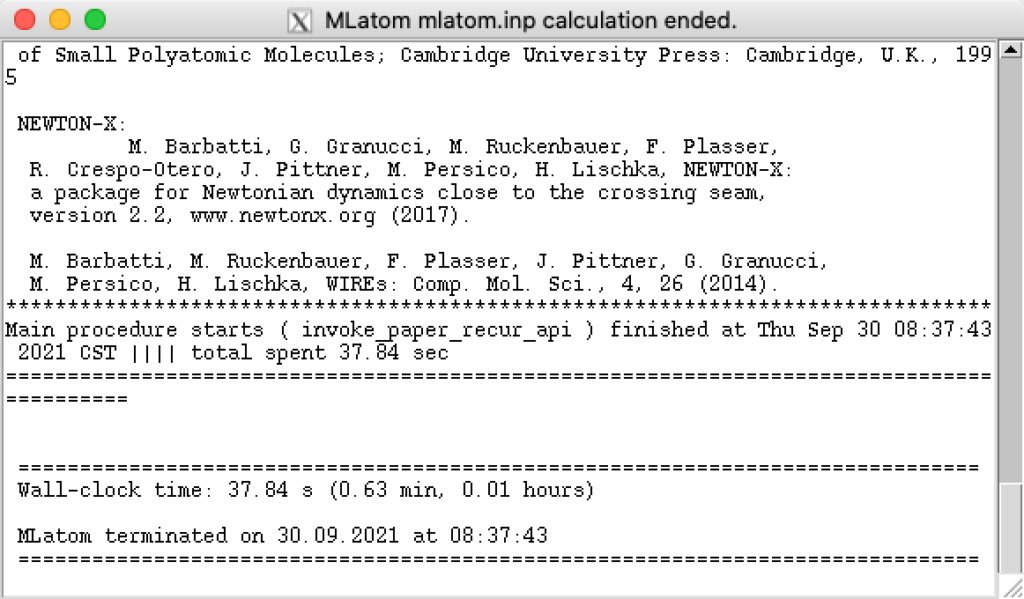
Then check the result in terminal:

All things is so simple using this GUI, all you need to do is just clicking!
you can also check the input file, standard output and error output with the file named “mlatom.inp”, “mlatom.inp.out” and “mlatom.inp.err”.
More detail, you can check this tutorial.
Example 2
Now we will try to calculate without any pre-calculated data. Please download the data below, and decompress it into a directory.
In this task, you need to install Newton-X and Gaussian at first. more details you can see: this tutorial.

But this time, the QC calculation part will take a long time, so it is not recommend to directly calculate within this GUI, you can modifiy the input file name, and click “generate input file”, then in the terminal, execute command MLatom.py mlatom.inp &> mlatom.log manually.
After the calculation finished, you’ll find that MLatom decide 150 as the optimal point number, but sometimes, ML cross section will be of bad quality even after meeting convergence criterion, so we want to check 50 more points (nQMpoints=200).
please create a new directory, and decompress the zip data to this new directory, now we will add additional 50 point, you can modify the input parameter as:

the plotting figure is at the path: cross-section/plot.png , you can check this figure with previous one.
more details you can see: this tutorial.